Showing posts with label Valentine's Day. Show all posts

Monday, January 6, 2014

snow day!!!!

We had our 2nd snow day today!  We're also off school tomorrow too, I'm running out of fun things to do!
Anyway, today Natty and I made heart crayons for her Valentines!

Here's what you need:
*crayons - old or new, crayola works best
*heart mold - I used silicon heart ice cube trays from Target


Here's what to do:
Step #1 - Put the crayons in warm water to help get the paper off.
Step #2 - Break the crayons in to 4-5 pieces.
Step #3 - Fill mold, over fill just a bit.
Step #4 - Bake for 15 min. at 250*.
Step #5 - Cool and pop out of mold.

Saturday, February 4, 2012

more valentines

Lil Miss's valentines are Flower Pops! She cut out 60 hearts all on her own! Some of them are a little rough, but she did a great job!! We hole punched them, folded them and stuck 'em on the sucker stick. She signed a tag with her name and done!!

Wednesday, February 16, 2011

Sew Busy!!

I've been super busy lately!!
I had a Valentines Box Decorating Contest with my 6th graders on Monday! The kids brought in some amazing boxes!! The winner made his Valentines box look like the White House!! Here's mine....
The top {where you put in the Valentines} said "Thank you SEW much!!" Then there was a little trap door underneath to take out the Valentines! Love it!!
I've also been busy on a dress order....four tank dresses!! These are super cute and will look adorable on lil E!! Here's one...


Another project I will be very busy with has to do with this....
Satin Taffeta!!
My very best friend's mom is getting married in a couple months. The girls picked out their dresses and want me to make their sashes!! There is rouching around the middle and they tie in the back! I'm so excited to be making these for the bridesmaids!!


Soon I hope to post some pictures of these finished projects!! And to be fair, I should post of a picture of my neglected laundry pile...when I get busy, that's the first thing to not get done!!

Monday, February 14, 2011

Love Love Love Birds!

At school today, I was visited by a lil friend wearing one of my creations! I love the tights she found to match!! Her mom said that she was walking down the hall and a teacher said, "Oh, that's a Natalie dress!" Yea!!
So cute!!

Thursday, February 3, 2011

Salt Dough Hearts

When I got the call that school was closed for the third day in a row, I started to panic a little! We were still at my parents' house and they were going to work, so it would be me and the kiddos all day! We'd already made valentines and pillows....then, I remembered seeing salt dough ornaments at Christmas time and thinking they were really easy and that we should try them next year. I decided to make salt dough hearts for the kiddos to paint and give to their grandparents/teachers/aunts/etc.
Here's what we did...
- Ingredients - I search the Internet for a recipe and the only difference among the recipes I found was the amount of flour to use. So in the end, we used 1 1/2 cups of hot water, 1 cup salt and 2 cups of flour. (We actually used wheat flour b/c that is what my mom had the most of, on hand.)
-We mixed the water and salt together first, and then added the flour, one cup at a time.

- I sprinkled some flour on the wax paper on the counter top and spread the dough out. I rolled it to about 1/4" thick.
-The kiddos cut out hearts with a heart shaped cookie cutter.
- We used a straw to make holes at the top of each heart (for a string to go through later) and then baked them for 2 hours at 200 degrees.

- We let them cool for awhile.
(We actually headed home at this point because out power was back up and the road was clear!!)
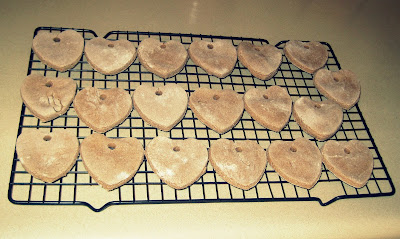

- Once we were settled in at home, I let the kiddos paint them using Valentine's Day-ish colors...red, pink, white and purple.


- We let them dry again!


- Once they were dry, I put ribbon through the hole, tied it and heat sealed the ends.


This was a super easy and super fun impromptu craft!! It definitely took all morning with the baking, cooling and drying that had to be done...but hey, we had all day!!

Tuesday, February 1, 2011

Photo Pops Valentines


I am so excited to share N's Valentines for this year!! I originally saw the idea at U-Create last year, and we made them last year. They turned out okay, but she was almost too young to pose correctly. So I decided to give it another shot this year and I LOVE how they turned out!!!!


First you take a picture of your child {or whoever is handing out the Valentines} and add text, graphics, etc. I have used Picnik.com and love it! Then order your prints or print them off at home. I used Shutterfly and had them within a week.


Once you get your prints, you need to slice the picture with a sharp pair of scissors or any type of handheld blade. You're going to slice on top of and underneath the hand that is going to hold the suckers.


Now add the sucker! Tape in the back might help secure the sucker, especially if the Valentines are going to be transported in a backpack to school!
As I type, we are expected to get 1-2 FEET of snow over the next two days....so I will be slicing and stuffing away over here!!


So excited to hand these out!! I also made a similar set {with my picture} to give to my students!

B, on the other hand, picked out Toy Story Valentines. Not that I have anything against boxed Valentines, I just would rather make them!!
HAPPY SNOW DAY!!

Saturday, January 29, 2011

You Color My World, Valentine!

For Valentine's Day 2009, my son and I made little heart shaped crayons for his Valentines! I used a heart shaped ice cube tray from Target's $1 bin...and surprisingly it handled the oven very well!! I googled this project for oven temperatures and baking times and got a variety of information, so I sort of experimented and it worked!
Here's what to do:
Step #1 - Take the wrappers off of the crayons. Soaking them in warm water helps a ton! We used Crayola brand after reading that other brands didn't work as well. However, we didn't try any other brands ourselves.

Step #2 - Break the crayons into 1/2"-1" pieces (small enough to fit in the heart molds).
Step #3 - Fill the heart molds with the crayon pieces...over fill since as the crayons melt they'll settle in the molds.


Step #5 - Bake at 300-350 degrees for 15-20 minutes. Let them cool and you're done!!

How cute are these?!


*If your child gives these out at school, it might be a good idea to make sure everyone knows these are not candy!*


I'm super excited about my next Valentine's Day post!! I'll show you N's Valentines for daycare this year - super cute!!!

Thursday, January 27, 2011

Countdown to Valentine's Day!


I LOVE Valentine's Day! So for the next few weeks, I'll be posting about a V-Day project that my kiddos and I have done over the last few years.
Project #1 - Fabric Rose Arrangement
I had B & N paint the terra cotta pots for a personalized feel and, at their ages when we made these last year, that was the best way for them to participate!
You'll need Styrofoam balls that fit nicely in the terra cotta pots. We used 2" pots and 2" balls. You'll also need fabric in a shade of red, to resemble roses, and glue (on a plate or in a bowl).
Once the pots are painted, put the Styrofoam balls into them. Cut the red fabric into 2"x2" squares.
Wrap a 2"x2" piece of fabric around the eraser end of a pencil. Stick it in the glue and then into the Styrofoam ball, and repeat until none of the Styrofoam is showing.
I have one of the ones we made last year in my classroom still displayed on my desk!

Thursday, January 6, 2011

Love Birds

My cousin got the dress I sent her daughter from this post! She sent me this adorable picture on my phone last night! Here's 'A' in her Love Birds dress! So cute!!