Showing posts with label flower. Show all posts

Saturday, April 23, 2011

Sweater Refashion

As I was figuring out what I was going to wear for Easter, I came across a sweater/shell set I got at Target awhile back. It is light pink and pretty boring.....so I jazzed it up a bit!!

Using the same fabrics from lil miss's Easter dress and this tutorial, I added two fabric flowers! I love how it turned out!


Have a very happy Easter!!!

Thursday, January 27, 2011

Countdown to Valentine's Day!


I LOVE Valentine's Day! So for the next few weeks, I'll be posting about a V-Day project that my kiddos and I have done over the last few years.
Project #1 - Fabric Rose Arrangement
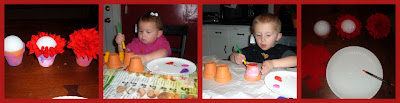
I had B & N paint the terra cotta pots for a personalized feel and, at their ages when we made these last year, that was the best way for them to participate!
You'll need Styrofoam balls that fit nicely in the terra cotta pots. We used 2" pots and 2" balls. You'll also need fabric in a shade of red, to resemble roses, and glue (on a plate or in a bowl).
Once the pots are painted, put the Styrofoam balls into them. Cut the red fabric into 2"x2" squares.
Wrap a 2"x2" piece of fabric around the eraser end of a pencil. Stick it in the glue and then into the Styrofoam ball, and repeat until none of the Styrofoam is showing.
I have one of the ones we made last year in my classroom still displayed on my desk!

Monday, January 17, 2011

Fabric Flower Headband


I am in LOVE with the fabric flowers that are on everything! I've tried a few different ways of making them, and I like this way the best!
Here's what you do...
  • Find your fabric and cut it 8"-10" long & 3" wide. These measurements don't have to be exact. I've used scraps that were not 3" wide throughout and it still works fine!!
  • Make sure your glue gun is plugged in and ready to go before you proceed!!
  • Fold your fabric in half (hotdog style) and start twisting it at one end.
  • Twist and wrap the fabric around until you've got a 2-3" circle/flower, or until you've reached the size you wanted.
  • Glue the remaining length of fabric underneath the flower.
  • Now you can attach it to an alligator clip, barrette, brooch, headband, whatever!
  • I bought a package of black elastic headbands from the dollar store that have worked really well.
  • If you want more than one flower on your headband, glue them down, side by side, on a piece of coordinating fabric.
  • Cut around the flowers. Glue the whole thing to your headband. Glue another piece of fabric, sandwiching the headband. Cut around the flowers again.
  • Glue on rhinestones, pearls, lace, buttons, whatever you can find to embellish your flower.
  • And there you have it! I love that I can make these to match literally anything N is wearing!! She wore the headband pictured to her 3 year photo shoot this morning!